Tuesday, January 31, 2012

Signs of Spring

Last week we received 4-6 inches of rain.  Hallelujah and Amen!!  With very pleasant temperatures in the 50's and 60's mixed with rain, it is starting to look more like spring around my house.  Many of my daffodils are up. One has a swollen tip, which means it is getting ready to bloom soon.  A few of my peonies are poking through the ground, and my peach and plum trees are showing signs of life with swollen buds appearing on their tips.  If temperatures remain like this, I may have daffodil blooms in a week or two.  Last fall, I planted  more daffodils and added Spanish blue bells in my flower beds, so I am looking forward to their upcoming appearance!

Daffodils, Shasta Daisies, Blue Muscari and Blue Dutch Iris


Sunday, January 29, 2012

Chicken Coop Care


Caring for hens is fairly easy compared to other pets.  Like other animals, chickens are healthier and happier if they live in a clean house (coop).  My coop used to be a three-sided barn used for cows.  To convert the barn into a coop, we added laying boxes, a roosting area, and put up siding on the open side to help keep them warm in the winter, and to protect them from the south wind.  The coop has a dirt floor .  I keep a layer of hay over the dirt.   Brody and I clean the coop out about once a month and add the used/dirty hay to our compost pile.  We add fresh hay or straw and let the girls scratch and peck through fresh hay to find bugs, seeds, or whatever else they might see that appears appetizing.  They love fresh hay!!!   


Chicken Coop 2010


Enhanced Chicken Coop & Yard 2012
 Recently, I figured out that I had a mite infestation problem.  I had to "dust" all of my girls and Mr. Rooster with DE Powder.  Our local feed store carries food grade Diatomaceous Earth (DE).  This is an organic alternative to other products often seen in stores -- such as Sevin Dust, etc.  To help prevent another infestation, I sprinkled DE powder under the hay directly on the dirt floor, all over their roosting areas, in their laying boxes, and in their dusting box.  

Roost (where they sleep/rest)


Laying Boxes

The white powder is in the picture above is DE, which is completely safe if ingested. It kills mites, ticks and other harmful insects.  Mites are especially nasty little bugs that get on hens and suck blood from them.  If left untreated, mites can be fatal.   Through a tip from another blogger friend, I found an interesting blog-site about hens (Tilly's Nest)  and picked up a tip about using a gadget called a pest pistol (pic below). This handy little gadget allows me to dust in cracks and crevices to get all of those nasty critters - especially the ones that like to hide.  


Pest Pistol


Where I purchased my Pest Pistol - Treats for Chickens Website
More information about DE - Keep Hens / Raise Chickens website


Monday, January 23, 2012

Eat your veggies. . .Balsamic Honey Glazed Carrots

I get excited when I find good recipes for fresh vegetables.  I made this recipe tonight and had to share because it is a keeper. 

This recipe didn't come from a cookbook, but from Pinterest (www.pinterest.com). This recipe was originally posted on http://www.sowonderfulsomarvelous.com/2010/01/cooking-challenged.html --- a really cute blog site. 

Here's the recipe:

2 pounds baby carrots or 2 pounds carrots, peeled and cut into size of baby carrots
EVOO

Glaze for carrots:
kosher salt
2 tbsp. EVOO
3 tbsp. honey (local if possible)
1 tsp. balsamic vinegar


Directions:
Preheat oven to 400 degrees. Put dry carrots on a roasting pan and drizzle with EVOO (just enough to coat).  Sprinkle with kosher salt and cook  in a hot oven for about 20 minutes. The carrots should be slightly brown on the edges and tender, but not mushy.   While the carrots are roasting mix glaze.    Remove carrots from oven and pour glaze over the carrots. Stir carrots and coat thoroughly with the glaze.  Put carrots back in oven for another five to eight minutes.  Serve warm and enjoy!

These are delicious and a great way to get a fresh vegetable on your plate very cheaply and easily!!! I'm sure these would be good as leftovers too. The glaze would only soak into the carrots and make them oh so much more delicious.  If you make them - let me know what you think.  Don't be afraid - Brody (my 14 yr. old son) loved them and we didn't have any leftovers. 


Sunday, January 22, 2012

Learning to Sew

Alicia came home this weekend and we spent a little quality mom/daughter time making a pillow case. While out shopping Saturday, we picked up some cute material for this project.  Her interest in sewing is quite an amazing thing.  She was pretty busy with softball as a child/teenager, and never expressed any interest in this skill.  In order to keep her interest and to have a finished project in hand (quickly), I decided that a pillowcase would be a great beginner project for her.  

After dusting off my equipment, and getting things set up, I was able to help Alicia complete the project in about an hour.  As she makes plans to move to her own place as soon as this summer, I foresee more sewing projects in the near future. 

My daughter-in-law, Jhnea, wants to learn to sew as well.  I think we definitely need to get an assembly line going (2 machines??) and make some stuff together to beautify a room in need of improvement, or something cute for my favorite granddaughter.  Maybe I'll get to make some napkins and table runner for me too!

Alicia's project:


Great job Alicia!


Monday, January 16, 2012

Garden Update

As I work on planning and creating my garden for the upcoming year, I have been checking my seed inventory.  I don't plan to start plants from seed this year due to mediocre results experienced last year.  One needs to have a green house or at least a growing light.  I'm not there yet. . . I will  direct seed most things, but will definitely buy my  pepper and tomato plants.  Two seed companies I have ordered from in the past are Seed Savers Exchange and Southern States Corporation.


Due to our on-going drought conditions, I have conservative plans this year.  I'm working now  to have the rows ready to go (measured, raked, weeded, etc.) and at the first hint of rain, I will plant  seeds (i.e. turnips carrots, lettuces, radishes, kale, arugula, chard, peas, cabbage, etc.) in succession for an early spring crop.   If we remain dry, obviously my seeds won't germinate and any transplants will perish.  If that happens, I will consider plans for summer seeds/plants. In the meantime I will keep hoping and praying for rain. 
 
This was a three day weekend for me, and we were blessed with mild temperatures and sunny skies.  I took advantage of the weather and got some tasks completed.  My son and I went to Home Depot and bought some manure/humus mix to put over my row of asparagus.  While at the Depot, I had saw some new plants in the herb section of the garden center. . .  I bought several sugar pea plants and cabbage plants. I thought I bought some cauliflower, but once I got home, I only had cabbage -- oops.  Oh well.... maybe  next weekend the cauliflower will be there.  My son is working on getting stronger for football, so he unloaded 20 / 40 pound bags of manure and hauled them to the garden for me. Thank you Brody! 


Row of asparagus half completed. I removed the weeds, secured
the soaker hose and added a thick layer of compost.

Cabbage transplants. 

Sweet Pea transplants


Pepper Poppers

People from Texas love jalepenos (chile peppers) and this recipe is one of my family's favorites. We tend to eat this more in the  warmer months, but if the grill is on - put some of these on the grill. If you have any leftovers, I'll be shocked!


Ingredients:
24 big jalepenos or so (stems removed and cut in half - make a little boat)
1-2 tbsp. EVOO
1 onion chopped finely
1 large clove garlic chopped finely
1 pounds sausage (we like Italian Sausage best, but pork breakfast sausage is good too)
1-8 oz. pkg. cream cheese (low-fat if you like)
1/4 cup shredded parmesan cheese 
1/4 cup shredded monterrey/cheddar mix cheese (optional)

Other things you will need:
Latex gloves
Pepper corer (Where to buy Pepper Corer) or small utility knife 
Foil
Sheet Pan / Cookie Sheet 
Non-stick Spray
Tongs with long handles

Directions:
Heat pan, and then add EVOO.  When you smell the aroma from the olive oil, add the onion and saute until  translucent. Add garlic and cook a minute or so longer.  Put onion/garlic mixture in a medium bowl to cool.  Add a little more EVOO to the pan for the sausage  (if needed), once oil is warm, add the sausage and cook on medium to medium low heat until done (no pink).  Break into small pieces as you cook.  Big chunks of meat don't fit in the jalepeno boats very well. 

Once meat is cooked remove from pan and add to bowl of onions. Let onion/sausage mixture cool to room temperature. 

While waiting for the meat too cool, prepare the peppers.   I suggest wearing latex gloves to protect your hands. Cut the stems off and cut the pepper in half lengthwise.  If you remove the seeds and white membrane lining, you will drastically reduce the natural heat from the peppers. If you like more heat - add some seeds to the meat mixture.

Don't forget your latex gloves.....Then remove white membrane and seeds.

Use tool or small knife to make this job easier.
A clean pepper boat has been created and is ready to be stuffed.
** My compost bowl is shown in the pictures above.  All of my vegetable scraps and eggs shells are placed in this bowl and added to my compost bin or fed to my chickens.  Just a side note in case you wondering what is in my bowl and why.

Back to the recipe now....

Once meat mixture is cooled add the cream cheese and other cheeses and stir until all are incorporated well.  If you add too soon - the shredded cheese will melt. You don't want it to melt yet.

Meat, onion, garlic, cheese mixture


Place a piece of foil on your sheet pan.  Get a small spoon and fill each pepper boat with a generous amount of the meat /cheese mixture and place each pepper on the sheet pan or cookie sheet.  This will be an easy way to carry to the grill.  

If the grill isn't already hot, heat now to at least 400 degrees.

Tear another piece of foil the same size as the sheet pan.  Spray with non-stick spray before you get to the grill. Place that piece of foil on the grill rack. Now use long handled tongs to place each pepper on the foil. If you don't put foil on the grill rack, your cheese may fall out of the pepper and fall into the flame.  I use foil so I can save any cheese that comes out and to keep the flames from flaring up. Close the lid of the grill and cook for 5 minutes.  Raise lid and check progress. When cheese is melted and peppers are black on the bottom (roasted), the pepper poppers are ready.  This usually takes 8-10 minutes.   Hopefully you can get your pepper poppers placed on a serving tray before everyone starts eating them. 


Notice in the picture above the black pepper turned over.  It has been roasted and will not be as hot as a raw chile pepper. Roasting peppers makes them sweeter!  

Serve as soon as possible after you take them off the grill.

Enjoy!


Saturday, January 14, 2012

Planning a Garden

It's January, and for me that means time to plan my garden.  March 16 is the average last frost date for our area. That is only two months/9 weeks away!!   This is the time to start seeds indoors, prepare/amend soil in the garden, repair/build supports for climbing plants, repair tools, etc. Some seeds (i.e. radishes, lettuces, etc.) can be sown directly now. 

Tonight I made a rough draft/plan for my spring and summer garden.  I have a 3-ring binder that includes notes from previous gardens, articles of interest, and pictures that inspire me. My notes help me keep track of what I planted - - where and when, which is essential so my crops can be rotated properly.  While rotating crops is important, planting vegetables and herbs with friendly companions (family members) is important to keep in mind too.  

My garden is a square and sectioned off in rows with a walk path in the middle (splitting the rows).  Ironically there is a form I use nearly everyday that I utilize to draw a plan of my garden.  Avery label template #5366 works very nicely for me because it is basically the shape of my garden!!!  I'm no artist and this form saves me lots of time, and keeps things organized and symmetrical!

While planning my garden, I try to envision the things my family will enjoy eating. Some things can be "put up" (canned) or processed and packaged for the freezer.  I hope to harvest a variety of things at their peak of freshness for us to enjoy immediately, and GOD willing, we will have extras to be saved and savored later this fall and winter.  

My garden sketch:


Some books I like and refer to regularly:


Helpful links you may like too:


Happy Gardening to you!  My mantra - Eat fresh, locally produced food as much as you can!!


Thursday, January 12, 2012

Taco Meat Recipe

My youngest daughter, Heather, has requested my taco meat recipe.  Here you go Heather ---


Ingredients:

2 tbsp or so of olive oil (EVOO)
2 medium onions diced (small pieces)
3 tbsp of minced garlic (4 big cloves or so)
3 tbsp of ground cumin
2 pounds ground chuck (room temperature if possible)
1 tsp of chipotle chile pepper powder
1 can beef broth (salt-free if possible /if not reduce salt you add)
1/4 cup tomato paste
Kosher salt to taste

Directions:
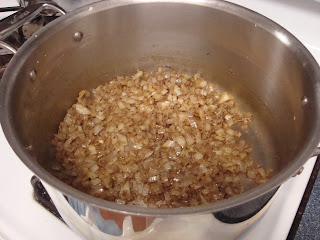
Warm pot on medium heat.  Add EVOO to warmed pot.  Add onions when you can smell the olive oil aroma -  but before it starts smoking.  Saute onions until they are transparent.  Add minced garlic and cook 1 minute or so.  Add 3 tbsp. of ground cumin and cook an additional minute. It will look something like the picture below and will be very aromatic. At this point, you will likely have people coming to the kitchen to see what is cooking.....


Now add the ground beef. Sprinkle meat with kosher salt. Break meat into small pieces and cook until it is browned and cooked through (no pink). Once meat is cooked, add the beef broth, tomato paste, and chipotle chile powder. Mix ingredients thoroughly. Bring this mixture to a simmer (bubbles) and then turn to low, and let this simmer on low for 15 - 20 minutes. The liquid will reduce and you will be left with flavorful meat that does not have any MSGs, preservatives, or added sugars!

When you finish it will look something like the picture below.


Serve with flour tortillas, over corn chips, or in taco shells.  Don't forget all the yummy sides - lettuce, tomato, cheese, sour cream, chopped onion and/or scallions, chopped cilantro, guacamole, salsa, etc. Refried beans and Spanish rice would round out the meal.  Have fun and enjoy!

*This is freezer friendly.  Cook as directed. Let cool. Put in freezer container - ziplock bag or tupperware. Label with date and description and put in freezer for another day!


Monday, January 9, 2012

Green Beans Recipe

My oldest daughter is in college and is cooking more and more all the time. She called the other day and wanted my recipe for fresh green beans. She no longer prefers canned green beans. Hooray!!!

Well - here it is - daughter just for you -- and anyone else who might like fresh green beans.

Ingredients:
1 pound or so of fresh green beans rinsed (stem end snapped off)
1 tsp. of kosher salt
1 onion diced
1 tbsp. or so of EVOO (extra virgin olive oil)
1 handful of slivered almonds if you like them
Directions:

Fill a stock pot about 2/3 full and add 1 tbsp. of kosher salt. Bring the water to a rolling boil.

While waiting for the water to boil, dice a medium onion into small pieces or the size you like. Sautee the onion in olive oil until they are transparent. At this point you can add a handful of almond slivers and sautee them for a few minutes. If this mixture gets done before the beans - just turn off the heat and leave all in the pan.

Once the water is boiling nicely. Carefully add the rinsed and snapped green beans. When the water comes back to a boil - set the timer for about 8 minutes. To check for doneness - pull a bean out and taste it. If the bean is tender and still bright green it is done. If the bean is limp and no longer bright green it is overcooked (but shouldn't be wasted).

Turn the burner on medium heat. Place the pan with the onions on burner to heat up again. When the green beans are done, drain them in the sink in a large colander. Then run really cold water over them to stop the cooking process. Shake the excess water off as best you can, and then add the green beans back to the heated pan with the onions (and almonds). Add salt and pepper to taste. Cook/sautee over medium heat until beans are warm and coated in oil. Serve warm. Enjoy!


A Garden that Inspires

In recent years, I have made drastic changes in what I prepare for my family when I cook. I now seek out seasonal  and locally grown fruits and vegetables as much as possible.   I have always loved to plant things, so a natural way to channel my desire to eat healthier was to create a "Potager", which is a French kitchen garden.  When I saw the two pictures below of a kitchen garden in Country Living magazine, I started serious planning.  Through the fall and winter of last year, my husband and sons worked hard to create a fenced area that that is almost 5,000 square feet!  My dad also helped out on the project by driving to Plano a few times in his pick-up to get loads of compost for me. 

Many of the plants listed in the CL article are not well suited for Texas, but the overall design of the garden is beautiful and inspiring.  I plan to give my garden structure and beauty while working in enough herbs and vegetables for us to enjoy throughout the year. Of course a variety of flowers will be included in my garden too.

Pictures of my garden taken last spring are below. My husband and two sons made the trellis with cedar trees cut down near one of our ponds.


I have some work to do to get the "look" of the garden in the magazine article.  And, unfortunately, last summer was the hottest summer on record for Texas.  

It's January now -- and time to plan (and start seeds) another garden.  I'll be sharing more in the coming days as we creep closer to spring and another growing season!

Saturday, January 7, 2012

Introducing My Favorite Girls and Mr. Rooster

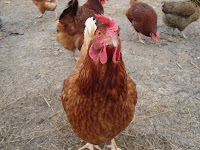
 About three years ago, I purchased some hens so we could enjoy fresh eggs. Who knew they would be so much fun? We enjoy watching them run across the yard chasing bugs and scratching the dirt for other tasty treats .  I have 46 hens and 1 rooster.  My girls provide us with beautiful and delicious fresh eggs.  I sell my extra eggs to friends, co-workers, or our friend at our local feed store.  Last week while we were in Canton, we purchased a refurbished laying box and 10 pullets from Norman Monk of Fowl Play Game Bird Farm of Ivanhoe, Texas (near Bonham). 


Mr. Rooster is in the middle amongst his ladies!


Playing around in the chicken yard.

Hens doing what they do best. . .

Our reward - beautiful eggs in a rainbow of colors!

Work in the Garden

Texas weather is a tricky thing. It can change drastically at any given time.  Today was supposed to be a really nice day, so I got up fairly early to make the most of the good weather.  I pulled up dead plants from last year's garden  -- peppers, basil, tomatoes, vines, etc. All of the dead plants were put in my compost bin.  I trimmed my asparagus to the ground and will try to get a thick layer of manure on it next weekend.  My tomato cages were put in storage for use later this spring/summer.  I was able till the entire garden  in November, so with a little raking I was able to make some rows easily and plant today too!  Due to the ongoing drought, I am trying to show restraint and not plant any bushes or trees.  I planted 2 bunches of white onions, 6 pink peonies (roots), 12 purple coneflower (roots) today.  I also transplanted 4 peonies I had in another bed that needed to be moved.   There is a 100% chance of rain predicted for Monday. Please be right this time Mr. Weatherman!


Part of my garden before the clean up.  See the brown stuff in the back? It's gone now!


Thursday, January 5, 2012

Succulents and Silver


When I saw the top picture above on www.pinterest.com, it caught my attention. I like old things arranged in interesting ways amongst new and modern things. After the holidays, my house seems so bare, so I thought I would add something vintage (with some green) to my home decor.  This week I went to a nearby antique shop on my lunch hour to search for interesting silver pieces.   It was my lucky day. I found two unique and ornate Victorian silver pieces and a nice tray with feet like the one above.  The bowl like pieces pictured second have wide openings and should work very well for this project. I looked at some cream and sugar serving pieces, but they seemed too small and narrow at the top and wouldn't have worked well. When the co-owner, Judy, told me her stuff was on sale for 25% off,  I couldn't pass up this deal!  I'll be looking around for a tall piece to complete the display.  This weekend, I'll be shopping for succulents for the pieces I have now.  Judy also mentioned they have lay-away. This could be a bad thing!!!

Monday, January 2, 2012

New Year's Weekend

My boys (husband and son) brought in the New Year quietly at home. We watched the Friday Night Lights series marathon. They loved it!!!  Who knew they would love this show so much!  I think I will have to invest in a Roku box and utilize my trial Netflix subscription to see the remaining shows.

I use to make resolutions, but I just kind of keep a mental note in my head now.  My personal task list is always long and I have many project ideas swirling simultaneously in my head.  Sunday morning we spontaneously decided   to make a trip to Canton. If you have never been, consider this a strong suggestion to make the trip. It is a huge and unique flea market.  As a result of my trip, I am now the proud owner of a hen laying box and 10 pullets (young hens).  I'll be sharing more about my hens and Mr. Rooster another day.

After our quick and fun trip to Canton, we did find time to enjoy a traditional New Year's Day dinner/supper -- Hoppin' John, Ham, and steamed cabbage. YUM!

Today as I prepared mentally to get back in the work routine after the holiday (sigh), I spent my day cleaning, organizing, and cooking/preparing meals for the week (lunches and supper entrees).  I tried a crock pot  Pulled Pork Recipe from a blog site I visit often for our supper. The boys loved it, so I'll add that to my "keeper" list.

As I reflect on the past year and think about 2012, I am thankful for family, friends, and good health. My family and I are all really blessed.  Best wishes to you for a blessed 2012!